

ENTERING AND CREATING DATA
-
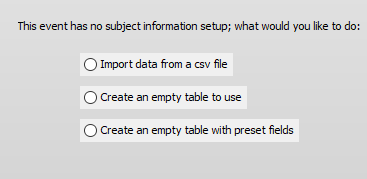
Once an Event is added to the Events panel, the order data can be entered. There are three ways to do this. Data can be imported from a .csv file, an empty table can be used, or a table with presets from School Prints ROES can be used.
-
To enter the order data, highlight the Event and click on Subject Info on the bottom right.
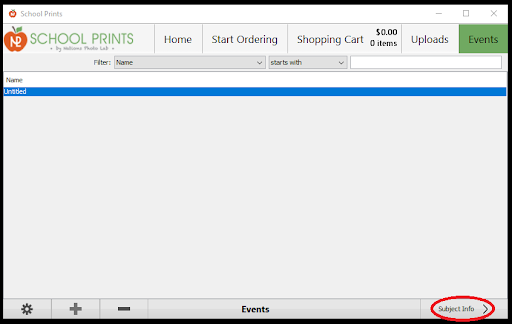
-
The options are to:
-
Import data from csv file
-
Create an empty table to use
-
Create an empty table with preset fields
-
----------------------------------------------------------------------------------------
OPTION 1:
IMPORT DATA FROM A CSV FILE
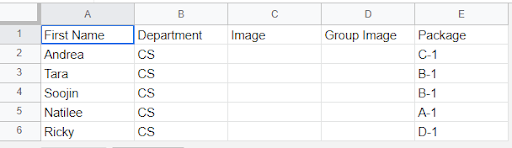
- Several software programs can be used to organize your orders while in the photo-taking process. Almost all of them will organize the session data as a spreadsheet where the columns are used as fields. If you organize the photo sessions in a spreadsheet program such as Excel or Google Sheets, ensure the same output format is used. Ensure all data fields are organized as columns and not rows.
-
The data from the ordering program or spreadsheet must be exported as a .csv file to import into School Prints.
-
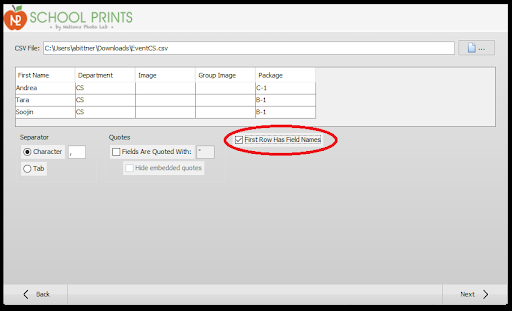
Select “Import data from csv.”
-
Then navigate to the csv file location and select that.
-
Once the csv loads, check the box for “First Row Has Field Names.”
-
*The field names should be the headers in the csv file.
-
-
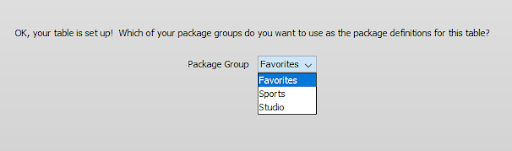
Select the favorites folder from the Package Group drop-down in the following screen with the needed packages.
-
Once the folder is selected, click “Next.” The new screen will ask about image files.
-
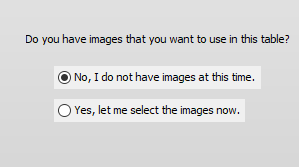
If the photo session has not occurred, leave “No, I do not have images at this time.” selected.
If the images are available, select “Yes, let me select the images now.” If the images are available, please refer to the Link images section for how to link the images to the order. - Once the image availability is selected, the Event will be available for data to be adjusted and the Event to be run.
----------------------------------------------------------------------------------------
OPTION 2:
CREATE AN EMPTY TABLE TO USE
- If not using an outside program to organize the order data, the data can be entered into an empty table within ROES. The table can be customized with any fields needed. The only fields required for an Event to be run are the image and the package.
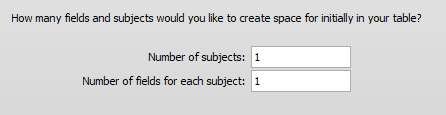
- After selecting to use an empty table, the next screen will ask how many fields will be needed for the data.
-
The number of subjects should be the number of subjects having their images taken. The number of fields for each subject is the number of fields needed to enter the data for each subject. When entering the data, additional subjects and fields can be added to the Event.
-
Once the subjects and fields are set, the next screen will select the Package Group favorites folder with the package to be ordered.

- After the Package group is selected, the next screen will ask about the availability of the image files.

-
If the photo session has not occurred, leave “No, I do not have images at this time.” selected.
-
If the images are available, select “Yes, let me select the images now.” If the images are available, please refer to the Link images section for how to link the images to the order.
- Once the image availability is selected, the Event will be available for data to be adjusted and the Event to be run.
----------------------------------------------------------------------------------------
OPTION 3:
CREATE AN EMPTY TABLE WITH PRESET FIELDS
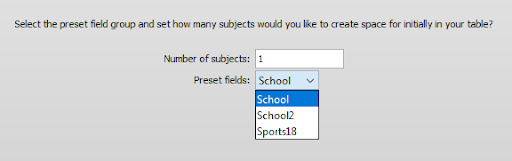
- School Prints has the option of creating a table with preset fields for data to be entered into. This will have the fields already labeled for easy entry. There are three presets to choose from. School, School2, and Sport18.
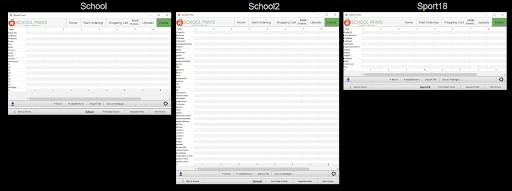
- After selecting to create a table with preset the next screen allows for the number of subjects that will be in the photo session to be entered and the preset table to be selected from the drop-down.
- After entering and selecting this information, the next step is selecting the Package Group with the favorite packers used for the order.

- After the Package group is selected, the next screen will ask about the availability of the image files.

- If the photo session has not occurred, leave “No, I do not have images at this time.” selected.
- If the images are available, select “Yes, let me select the images now.” If the images are available, please refer to the Link images section for how to link the images to the order.
- Once the image availability is selected, the Event will be available for data to be adjusted and the Event to be run.
----------------------------------------------------------------------------------------
Follow the next steps below in order
Comments
0 comments
Article is closed for comments.